Equipment needed for Spray application:
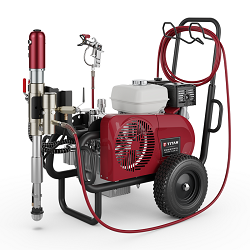
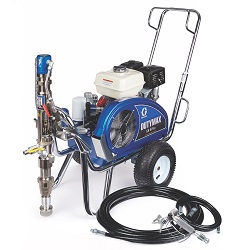
- Use only airless spray system with a minimum capacity of 1.0 gallons per minute at 3000 psi. A recommended sprayer would be a Graco DUTYMAX or Tital 12000 DI.
- Make sure equipment is in good working condition prior to spraying. Replace used or worn seals prior to spraying Ceramic Insulation Coating.
- Use 3/8” spray hose line or larger only! For long runs (200’ or 66m) use 1/2”/12mm hose for 100’/33m or even 150’/50m combined with 3/8”/10mm size for final 50’/17m to 100’/33m length. This allows the lightweight material to flow more effectively over the longer distances.
- Use a reversible nozzle with tip size .021” - .025”. Tip size depends on area to be sprayed. For small areas a (321”) fan size should be used. On larger areas a 521-523 works well.
- Use a Graco CONTRACTOR GUN with 3/8” hose or larger.
- REMOVE filters in gun or pickup tube or sprayer.
- Use a respirator or dust mask, paint suit or similar clothing when applying coating.
- No more than 3’ of 1⁄4” whip.
- Use a Graco Contractor, FTX or XTR gun or equivalent. Do not use a Graco Silver as this will hinder flow rate of the coating.
- Use a 1⁄2” drill motor with reverse setting to prevent scraping plastic off sides of pail.
- Use a 1⁄2” sheet rock mud-mixing paddle (cast blade type)*.
- Pail opener and/or knife*
- Hopper or other 5 gallon pail
- Have access to water to clean equipment, spray guns, tips, mixing paddle, etc.
*We can recommend products designed for Ceramic Insulation Coating application. TTS Products also provides a Small Application Sprayer designed for areas under 100 ft2 (10 m2). This sprayer can be used with conventional air hose (3/8”).
Please follow these directions closely. Failure to apply coatings using recommended instructions can result in costly delays and waste your time. If you have any questions or need assistance, please call us at.
Spray application of Ceramic Insulation Coating Insulating Coatings:
- Upon delivery, please inspect containers for any damages. Make sure pails are not punctured, torn or ruptured. If any damages are noted, please contact shipper or Deep Energy Solutions.
- Open container with pail opener or other means.
Possible separation of coating is natural due to insulating particles. DO NOT BE ALARMED as it is natural. Use the mud-mixing paddle provided or obtain one from a home improvement store. (Colder environments may make coating crustier and requires more stirring than hotter environments.)
Place feet on sides to keep pail from spinning. Slowly turn paddle on reverse setting only. Reverse setting only will insure that paddle will not scrape sides of pail and add plastic shavings to contents. Stir product at 5-10 second intervals at low or medium speeds only until it resembles a milkshake consistency (20-40 seconds) total in ambient conditions of 70°F or greater. Over-mixing (more than 5 minutes in ambient conditions of 70°F) may destroy particles and reduce insulating capabilities. Turn pails upside down 8 hours prior to application or overnight to make mixing easier.
REMOVE ALL FILTERS FROM GUN AND SPRAYER. This is very important to ensure coating flows through pump and spray gun. Flush any solvents from pump with water. Prime pump using water only with either gun removed from line or with nozzle off the spray gun.- FLUSH 10-15 GALLONS OF FRESH WATER THROUGH SPRAYER TO REMOVE ANY THINNERS OR DEBRIS. Ceramic Insulation Coating consistency requires seals that are in good condition in the pump. If seals are weakened or have small cracks, pump pressure is hard to achieve or maintain.
Place pump intake nozzle in product pail and run product in sprayer. Prime without spray nozzle. When product consistency appears thick, stop sprayer and attach spray nozzle. Place tip in reversible head, place reversible nozzle on gun and insert tip. Product is now ready for application. Slight tip clogging may be more common initially as the product will have a tendency to clean the sprayer and line of accumulated residue. If older lines are being used, tip clogging may last longer.
Use sample area to adjust sprayer pressure. With most large pneumatic sprayers, air pressure of 80-100 PSI is adequate if CFM is consistent. If CFM is reduced more pressure will be needed. Make sure to set pressure only high enough to stop fingering or keep pressure consistent. If pressure is not consistent then either there is a volume problem with the pump or not enough air supplied to the sprayer. It may take a minute to get the pressure right and achieve the spraying consistency. Make sure that the unit also has sufficient air flow so it does not starve the unit for power.
Spray product onto substrate in a methodical fashion. Remember that the point is to build up the coating thickness with layered applications. It is very important to insure an even coat across the surfaces.
Drying times will be extended with high humidity or in colder conditions. Coating may be applied up to max of 20-25 wet mil (0.5mm) layers. Normal dry coat thickness is 20 mils (0.5 mm) per application. Usually four to six passes equals one full coat. The more coating the better the insulation. Dry times do not typically exceed 1-2 hours at 75°F ambient. In colder conditions, application of heat and/or forced ventilation will be necessary to insure even coat thickness and to reduce risk of slides. Lighter thicknesses procedure should also be used to help evacuate the water out of the coating at a faster rate. Confined spaces will need forced ventilation in all applications to keep humidity levels from rising due to water evaporation. For vertical surfaces a light initial tack coat of 8-10 mils (0.23-0.25mm) is recommended to insure proper hang. Use a wet mil gauge when applying the coating to insure proper thickness.
For cold weather installation, lighter passes of 8-10 (0.23-0.25) mils will expedite dry times. This will also insure a nice even coating. With lighter thickness, the coating will dry more quickly. To test for proper dryness, place your thumb onto test area of the coating and press down. Turn your thumb 90° and remove. If coating is left on your thumb, the coating is not fully dry. IT IS VERY IMPORTANT TO INSURE COATING IS FULLY DRIED PRIOR TO NEXT COAT!
Coating should be measured with a dry mil gauge after each coat to insure proper thickness. Dry times will depend on temperature and humidi